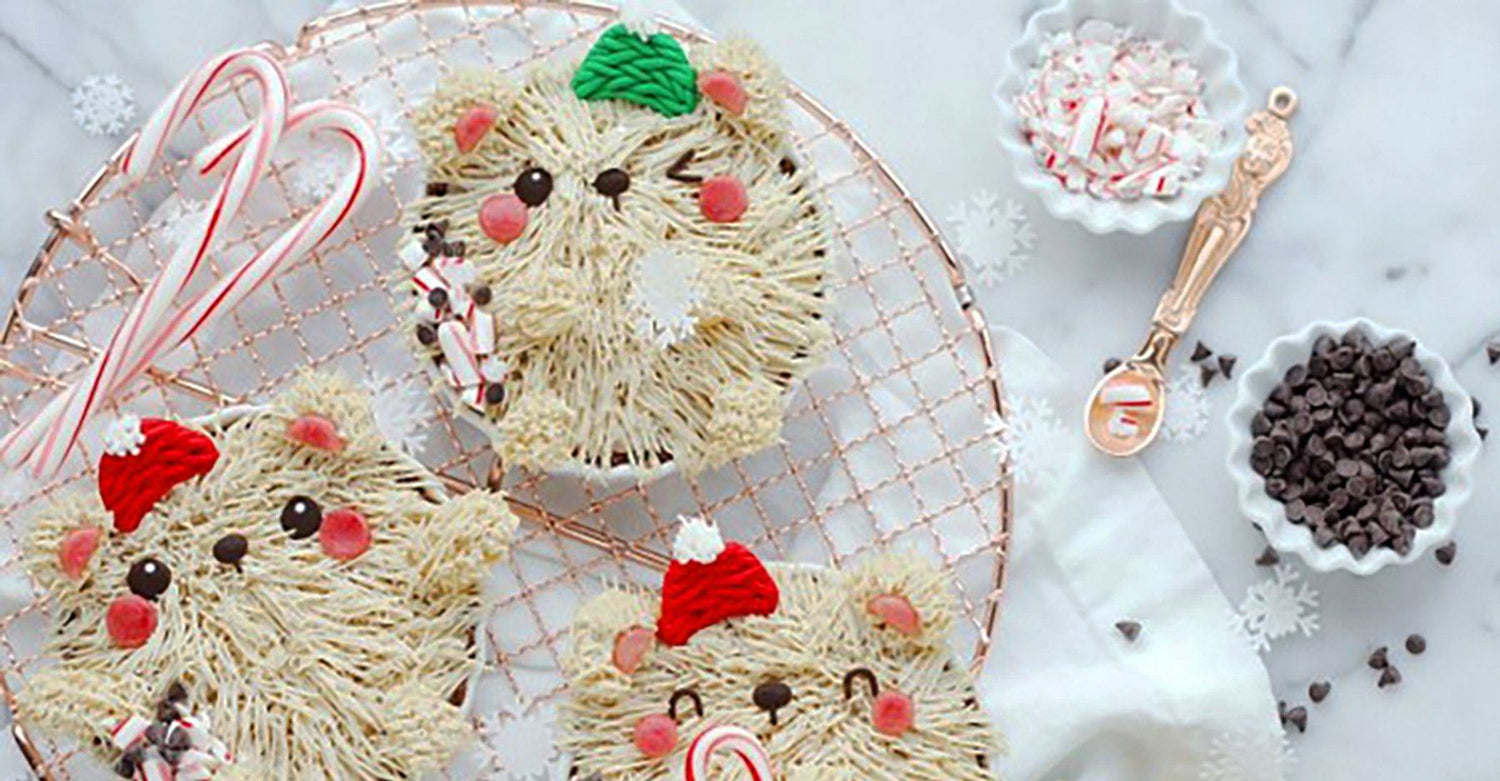
A beary cool dessert full of wintry flavor using Great Lakes Collagen. These dark chocolate peppermint tarts are dairy, gluten, and refined sugar free (depending what type of candy canes you choose to use), and they are DELICIOUS!! Starting with a dark hazelnut crust, then topped off with a cool, creamy peppermint vanilla filling that totally tastes like peppermint ice cream. To make them extra adorable pipe cashew buttercream fur to turn them into teddy bear style polar bears with a little marzipan underneath for the ears and paws. Decorate with chocolate for the faces and itty-bitty knitted fondant hats. This recipe is a piece of cake - you just blend, fill, and freeze the tarts. Recipe by @luxeandthelady
- Serves: 3-6
Ingredients
Chocolate Hazelnut Crust:
- 1/2 cup hazelnuts, toasted
- 1 cup almond flour
- 1/4 tsp sea salt
- 4 medjool dates
- 2 tablespoons unrefined coconut oil, melted
- 2 tablespoons cacao powder
Vanilla Peppermint Filling:
- 7 ounces coconut milk
- 1 1/2 cups raw cashews, soaked
- 3 scoops Great Lakes Collagen Peptides
- 1/8 teaspoon sea salt
- 1-2 tablespoons maple syrup (or 7-10 drops stevia for low glycemic)* sweeten to taste
- 1/4 teaspoon peppermint extract
- 1 teaspoon vanilla extract
- 1 tablespoon coconut oil, melted
- 2 candy canes crushed, plus more for garnish
Polar Bear Decorations:
- 1 cup cashew buttercream
- 1/4 cup dark chocolate chips
- Marzipan candy dough
- Beet juice (for coloring)
- Red and green fondant* (optional, for hats)
Directions
- You will need to soak your cashews for the filling. Stir 1/4 tablespoon Celtic or Himalayan pink salt into 3 cups filtered water in a medium sized glass bowl. Add the 1 1/2 cups of raw cashews, cover with a thin kitchen or tea towel, and allow the bowl to sit on the counter for 3 hours. Before using the cashews, rinse and drain them until the water is clear.
- If your hazelnuts are not toasted, spread them out onto a baking sheet and bake at 350°F for 5 minutes, allow to cool for a few minutes before starting the crust.
- To make the crust, prep your tart pans by lightly greasing them with melted coconut oil. Place the crust ingredients in the bowl of a food processor and process for about 1 minute, or until the ingredients start to stick together. I like to add the hazelnuts at the very end and only blend until chopped so the crust is still crunchy.
- Evenly distribute the crust between the tart pans, and firmly press it into the bottom and up the sides using the palm of your hand or the bottom of a small drinking glass (the back of a spoon also works well).
- Transfer the pans to the freezer while making the fillings (I find it helps to place them all on a baking sheet first to make it easier to move them around).
- Place all of the filling ingredients (except for the candy canes) in a high-powered blender, and blend until smooth. I like to work my way up to high and then let it blend on high for 1 minute to get it super smooth. Stir in the crushed candy canes.
- Remove the tart pans from the freezer and pour the filling into each. Return to the freezer for at least an hour, or overnight before decorating.
- When you are ready to decorate the tarts, use a grass piping tip to pipe long cashew buttercream all over the top for fur. Add marzipan for the ears and paws and cover those with buttercream as well.
- Melt the chocolate in 30 second intervals (at 50% power) stirring in between, until smooth. Use a toothpick dipped into the chocolate to draw the faces onto wax paper, and transfer to the top of each tart once set.
- Color a little marzipan with beet juice and add to the middle of each ear and under the eyes for cheeks. Garnish with more crushed candy cane and enjoy!
- The tarts will keep for a few days wrapped and stored in the refrigerator, and up to a week in the freezer.


